
Target Indication Methods
Something that often comes up, and which I include at a basic level in the instruction at the HEAT 1 Combat Tactics class, is target indication:
One of the hardest parts of your battle drills is location of the enemy. This applies to any reaction to contact that you may conduct, whether it is a break contact drill, or a squad hasty attack. When discussing fire and movement, it is plain that “no movement without fire” refers to accurate suppressive fire onto identified enemy positions. If you cannot locate those enemy, you cannot suppress them. Secondary to this, if you cannot communicate the located enemy position to your teammates, then you cannot direct the fire of your team onto the enemy in order to suppress them, in order to allow for safer movement.
Shoot – Move – Communicate thus takes on an urgent meaning, rather than just being a buzz phrase that is repeated ad infinitum. It is not enough to shoot and move: you must communicate as a team in order to be effective at this.
There are three parts to this subject:
1) Location of the enemy. This is not the subject of the post today, but in simple terms this is observing/listening to identify enemy firing points.
2) Target Indication: once a team member has located the enemy, he will pass a target indication, as well as engage the enemy with accurate fire.
3) Fire control orders. This is where a leader controls the fire of the tactical element in order to suppress the identified enemy positions(s).
Target Indication
Direct Method:
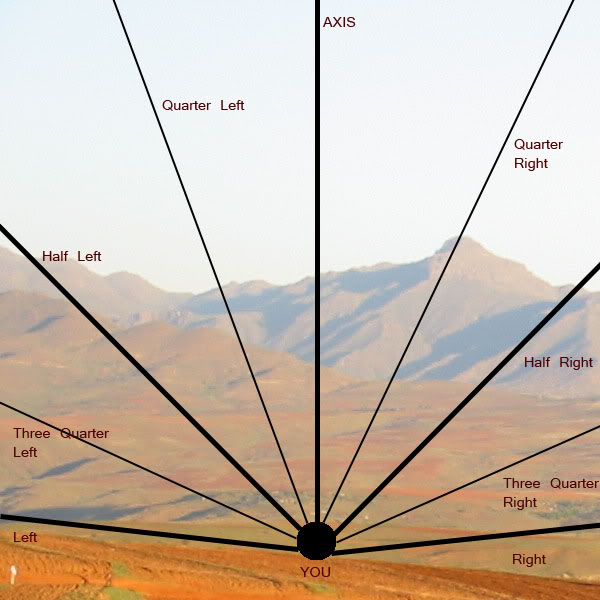
This is a simple method of dividing the ground in front of you, either side of the axis of advance, into segments of left or right (see diagram). It is a simple way of getting everyone’s attention by having them swivel their heads in the right direction. It should be used with a range and also a description.
For example: “Half Left! 300! Lone Tree! Enemy at base of Tree!”
The direct method (and other methods) can also be used in conjunction with tracer/strike. You use the indication provided by tracer to point out the enemy location. Or, you use the strike of your round impacting near the enemy position. The ground has to be suitable for strike to work i.e. kick up enough dirt.
Example: “Half Left! 300! Left of Lone Tree! Watch my strike/tracer!”
(You can load magazines in certain ways with tracer, such as the first several rounds being tracer, for just such a use. Just be aware if your tracer is immediate or delayed – much tracer does not light up until 100 meters, in order to protect the location of the firer, and thus cannot be used for target indication within those ranges).
A simple target indication is the ‘3 D’s’ which stands for Distance, Direction, Description. In this case, the description part can be use of the direct method, combined with the distance already given.
Example: ‘100! half left! Enemy in woodline!’
Reference Points:
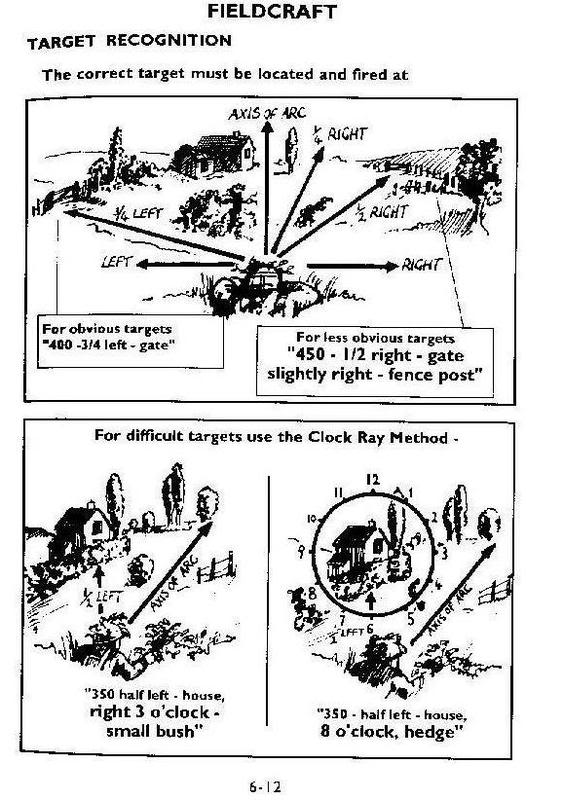
This is where you use identifiable points on the ground as a basis for a more complex target indication. Ideally, the reference points would be given from a place of safety, overlooking the axis of advance, before the squad sets out. Using range and the direct method, the squad leader will designate several obvious locations and give them names. It is vital that you know how to accurately estimate distance/range.
Example: “200. Half Left. Barn. This will be known as Barn.”
If you did not do this in advance, you can still use range and the direct method to direct attention to an obvious location, then go from there.
When using reference points, you need to be able to describe where the enemy is in relation to that reference point. It could be easy:
Example: “Barn. Bottom right corner of Barn. Enemy machine gun.”
Clock Ray Method:
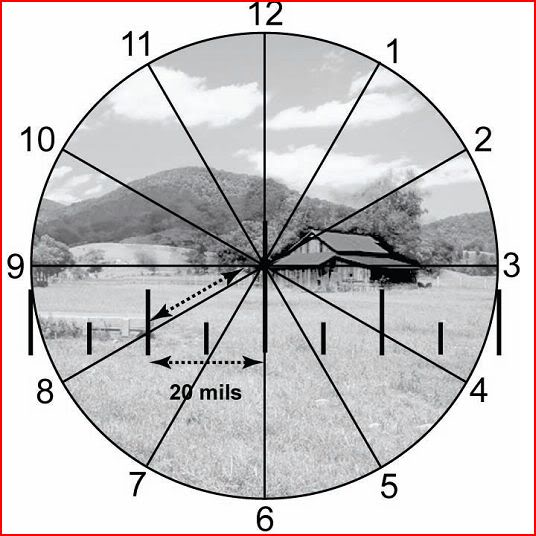
The diagram above shows how to use the clock ray method in conjunction with a reference point. The clock face is not overlaid on your location, but on the reference point, in a vertical manner. You can use this to move from the obvious reference point location to another less obvious location.
Example: “Barn. 8 o’clock from left edge of Barn. Gate. Left of gate, enemy in hedgeline.”
On the diagram above it also shows the use of binocular graticules to reference distances to the left and right of reference points.
The diagram below shows a simpler method, using hand angels, particularity if everyone does not have binos. You don’t even have to reference the mils, just talk about knuckles and fingers (everyone’s are roughly similar enough for this purpose).
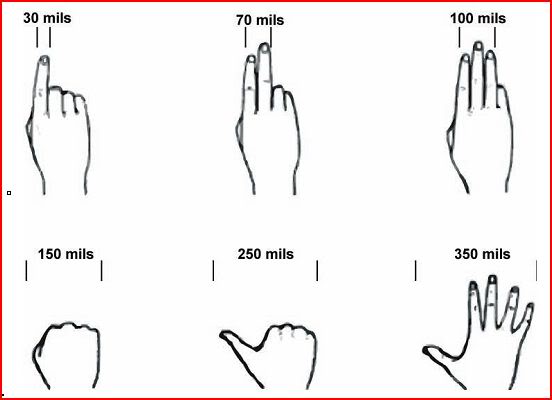
You simply hold your hand out at arm’s length and estimate how many knuckles or fingers your target is to the left or right of the reference point.
Example: “Barn. Two knuckles left of Barn. Enemy in gap in hedge.”
Example: “Barn. 8 o’clock from left edge of barn. Gate. Two knuckles left of gate, enemy in gap in hedge.”
Another diagram:
It’s all in these videos, from the 1960’s!
Part 1:
Part 2:
And of course there is this:
Leave a Reply
You must be logged in to post a comment.