Range Safety For Tactical Classes (Updated)
The purpose of this post is to get people a head start, and to allow them to practice the safety manipulation, before attending class. These safety rules are briefed in detail as part of MVT classes. It has been suggested that I make a video on this, but in the meantime.
The basic basic range safety at MVT is simple, but it would help a lot if this were practiced in advance of class:
1) Trigger finger outside the trigger guard unless engaging a positively identified target (PID). Lay the trigger finger alongside the weapon, on the lower.
2) Safety is on safe at all times unless engaging a PID. Thumb rests on the safety.
3) Active muzzle awareness: the weapon is held in the patrol ready position (vertically, muzzle pointed down, with the need to break the wrist on the firing hand to allow it to do so).
4) Never move faster than you can safely go, while maintaining safe carriage of the weapon (active muzzle awareness).
There is a little more to it than this. but that will be covered in the safety brief and reiterated throughout the class. If you can master the safety rules above and are used to them before you show up at class, that is golden.
What would be hugely beneficial is if you would dry fire practice the following:
Whenever the weapon is not up in the ready position (whenever you break the weapon down from the ready position, take your eyes out of the sights) then you need to manipulate the safety to safe. Have your thumb resting on the safety and practice bringing the weapon up to the ready position and manipulating the safety to fire. Then, bring the weapon out of the ready position and manipulate the safety to safe. Do 1000 repetitions of this!
The ready position is when the weapon is held ready to fire, eyes on the sights: whenever you break it down even a little bit, to look over the top of the weapon, or to go back to the low ready or patrol ready position, the safety is put on safe. This also applies to all combat reloads and stoppages / malfunctions – the weapon is placed on safe, or an attempt is made to do so.
When these safety rules are ignored, then there is the potential for a negligent discharge (ND). The main crimes are not applying the safety, and having the finger inside the trigger guard. If you do that, there is the potential to pull the trigger, particularly when moving (or falling).
Left Handers: Same rules apply! If you have a standard unmodified AR, then bring the thumb across the pistol grip to manipulate the safety. You can keep it there or move it back, up to you.
Ambidextrous safety: The safety is only manipulated with the thumb. The index finger is for pulling the trigger, the thumb is for the safety. DO NOT have an ambidextrous safety and move the safety to fire with the thumb, and then when putting back to safe, move it back using the opposite side with the pad of the hand. This will also potentially cause an ND. It is OK to be a left hander and have an ambidextrous safety so the weapon is set up for you, but again, only use the thumb.
SAFETY ANGLES
Safety Angles: This was raised on the forum and I was asked to cover it here. This may be complicated and if so, focus on the other safety rules above, and you will be thoroughly briefed on safety angles at class.
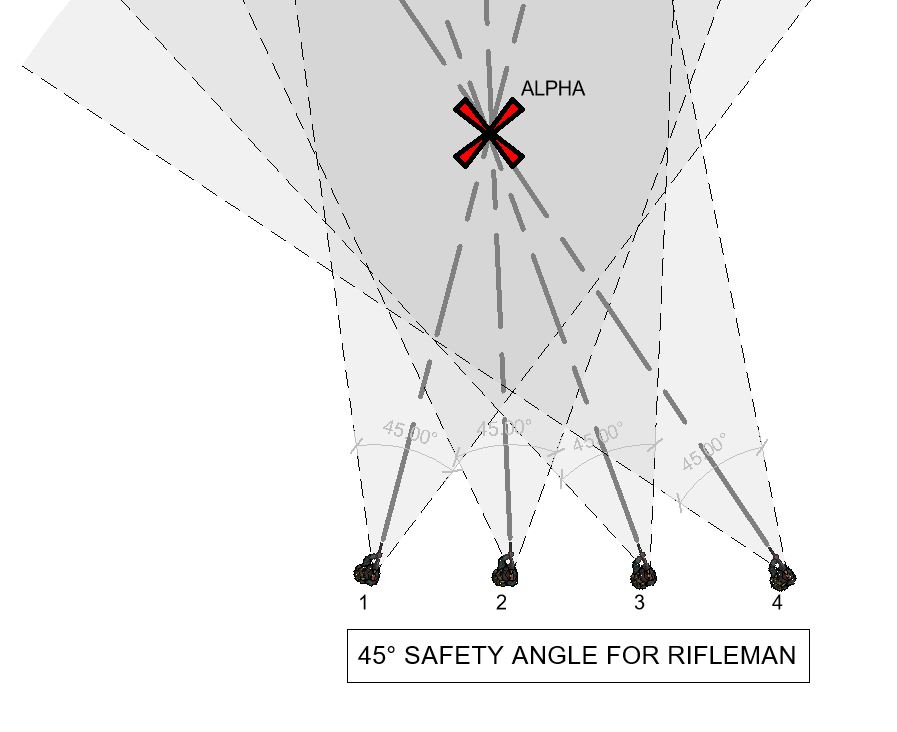
An individual safety angle is a cone either side of where you rifle is pointed at a target (or would be pointed, if you were to engage a target, but may not, due to the safety angle). To see (visualize) the safety angle, extend your arms out in front of you and make a 45 degree angle. Imagine your rifle muzzle is center of that angle. If any of your buddies are within that cone, you cannot engage, and would either not raise your rifle, or would apply the safety and lower it.
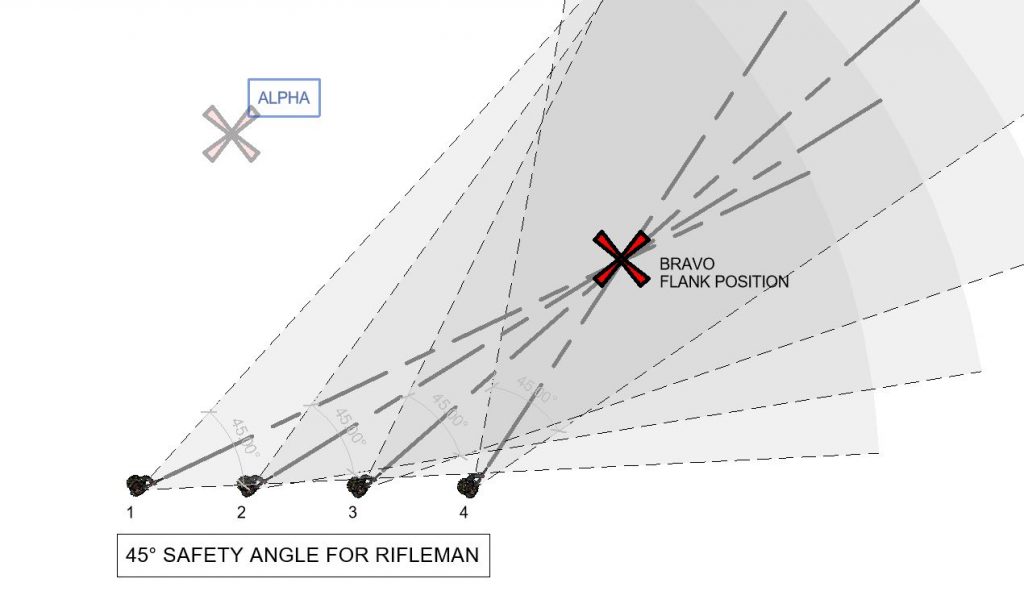
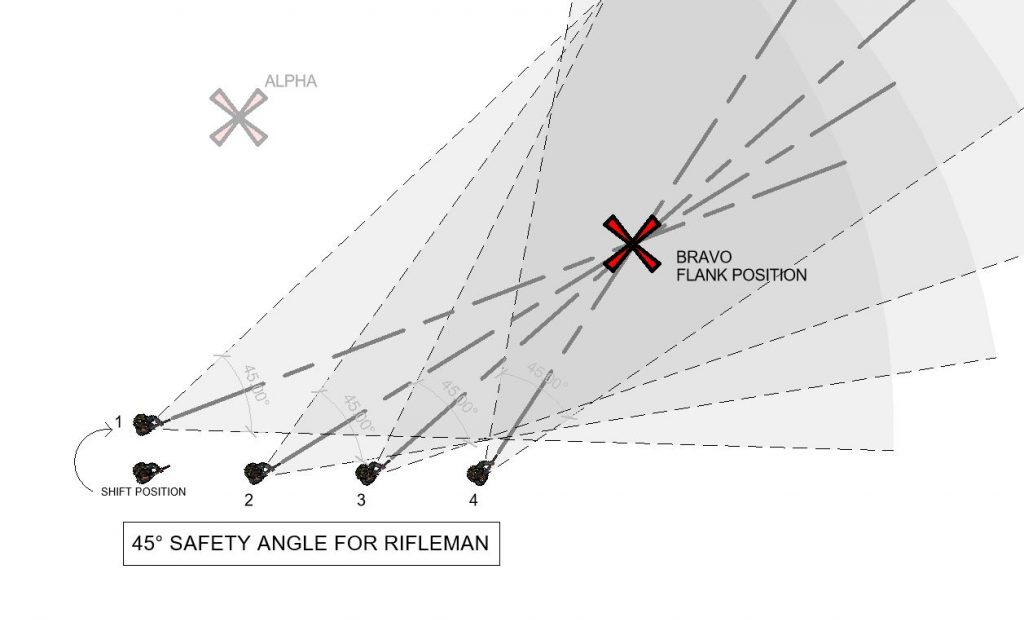
The safety angle is moveable. As targets appear, it applies to each target that appears. You may be engaging a target, and your safety angle is clear. If a flank target comes up, where engaging it would put a buddy inside the safety angle, then you cannot. In that case, you would need to move. This is covered in detail at class.
Some diagrams showing this. We are using the 45 degree angle:
Here are some diagrams illustrating how the safety angle is applied: