Considerations for Night Operations
To be truly dangerous to your enemies, train at MVT.
Let’s talk about night operations. This is a topic that often comes up, particularly with regards to modern night vision equipment. There are multiple aspects to discuss about night operations, so my intent will be to give a broad brush of the various aspects in order to clarify, and open it up to comment and discussion.
We are primarily concerned with the armed civilian in an SHTF environment. Thus, you will only have the equipment that you purchased or acquired. We can certainly take pointers from practices within the military, and that is part of the intent of this article, but we must also be realistic and realize that we are not going to be issued all the latest gear. The gear you have is a function of what you can afford.
There is absolutely no reason why you cannot conduct effective night operations in a low tech manner. The flipside to this is if your enemy is equipped with high tech night vision equipment, then you may put yourselves at a disadvantage. That is what we call a non-peer situation. So in this article I’m going to look at both low-tech and high-tech options. Remember, just because you have all the gear (and no idea), doesn’t mean you have it squared away. You can have a PVS-14 stuck to your eyeball, and a thermal imager in your pocket, but if you’re tactical gnome blundering around the bush, then it really can’t help you. You can’t simply buy yourself safety!
‘Back in the day’ (like, the 90’s!) we used to patrol either without, or with minimal, night vision equipment. I have spent many an hour, or night, wandering around in the darkness either on training exercises or actual operations. It is entirely doable. The problem you may have is that when you are dealing with the challenges of operating in darkness, and someone else with night vision equipment is observing you do that, they have a clear advantage over you. Yes, we are not going to panic over the ‘all seeing eye of Mordor’ but have no doubt of the effectiveness of surveillance equipment when observing terrain at night. As your patrol moves in single file across the open hillside, cloaked in darkness, the observation post (OP) a couple of miles away equipped with thermal surveillance equipment, will be watching you clear as day.
So let’s first look at some factors and considerations for operating at night without modern night vision equipment. Darkness is certainly a challenge: if you walk out of your brightly lit house into your backyard at night, it is hard to imagine operating in such darkness. However, natural night vision is a wonderful thing. It takes time to develop, anything from 45 minutes and improving over a couple of hours, and it can be lost in an instant of exposure to white light. On anything but a moonless, cloudy, and miserable night there is always light to see by. How much depends on the moon state and cloud cover; you may have experienced being out in the woods with a moon and clear sky, casting the shadows of the trees across the white snowy ground.
Natural night vision is something that you must develop and prize. As darkness falls you must allow the night vision to develop, without exposing it to white light. If you are planning on exposing yourself to light, such as flashlights, GPS screens and similar, then carefully guard the night vision in one eye by always keeping it closed when performing such tasks. The other thing about night vision is that due to the distribution of the rods and cones on the back of your eyeball, in darkness you will see better by looking slightly away from an object; your peripheral vision is better at night. Therefore, if you think you see something, resist the temptation of staring intently at it. This will actually mean that you see the object less clearly. Look slightly away from the object and you will get a better picture.
So, whether you are out in the woods in a patrol base, or in a building, as night falls you need to carefully guard your night vision. Consider, if you are based at a retreat location, only using low level red, green or blue lights inside at night. Then, when you do go out on patrol you will find that you can actually see very well. You just need to gain the confidence, which will only come by practice, of walking around at night. I will add as an aside however, that the more exhausted you become the more you will tend to hallucinate at night. It is entirely possible to see things at night in the darkness that are simply not there, particularly if fear is playing on your mind. Be careful of this, and remain calm.
A note on colored light: Red filters used to be all the rage. They do however wash out brown contour lines on maps. Green washes out wooded areas on maps. Blue has reached a recent ascendancy because it allows you to see blood on clothing better, if dealing with a casualty. I will admit that for the longest time I patrolled using a mini-maglite, white light, with a small hole pushed through electrical tape covering the lens. It worked for me, find out what works for you. You do however need to be aware that any small visible light source that you use to check a map, will be many times more obvious when viewed by an observer using IR night vision. You can of course focus night vision devices (i.e. PVS-14) in to look at a map or read a notebook, and even use an IR flashlight to aid this – but of course be careful with light discipline and enemy observation. Ideally you need to get below something like a small tarp to view the map in a cupped hand, in a hollow.
If you are operating low-tech, or perhaps you only have a couple of night vision devices to spread around, then this will have an effect on your patrol signals and formations at night. You will need to close up the distances, the interval, between individuals in your patrol. At halts you will need to close up, usually into a herringbone formation (facing out alternately left and right), so each man touches the next man. This will not only aid with accountability, but if it is so dark that hand signals cannot be seen, you may have to pass signals by whispering into the next man’s ear. Bearing in mind that you may be observed by an enemy who is equipped with night vision devices, you don’t want to close up too much. Try to remain as spread out as you can while maintaining visibility with the patrol member in front of you. One of the great dangers when moving at night is splitting the patrol, and it is every man’s responsibility to ensure he does not lose either the man in front, or the man behind. Little techniques will aid with this, such as the use of glowing ‘Ranger eyes’ on the back of the cap, helmet, or equipment of the man in front.
Do not assume that darkness will mask your movement. At night you need to patrol as if it were daylight. The use of terrain, vegetation, and even weather masking, will help conceal your movement from those potentially observing you. Be wary of skylining yourself on ridges, silhouetting yourself, whether by following along the crest or by crossing over. Crawl over, breaking up shape using cover, if necessary. When using terrain masking, be careful: don’t simply follow the bottom of a ravine or defile. That will put you in ambush country. Better to contour somewhere between the bottom of the valley/draw and the ridge line: this will make your movement less obvious and also potentially place you in an awkward position for anyone that has set an ambush: you may either walk into the side/flank of the ambush, or just simply be further away than where they intended the killing area to be (i.e. the valley floor). It goes without saying that you should not use trails, even if they are easier to move along at night.
So there are challenges of moving at night when working low-tech. But it’s actually something that you can get used to after a little bit of practice. You can get very comfortable at it. You need to just take account of the difficulties the darkness presents, with the lower visibility, and compensate your patrol conduct as required. Your pace will be slower, in order to avoid excessive noise by blundering around in the trees. You will need to close up a little to take account of the reduced visibility. You’ll need to make extra efforts to ensure the patrol does not become split or separated. You will need to close up at halts in order to pass any hand signals, whispered messages, and to ensure accountability.
What happens if it goes hot? If you get into contact? If it’s dark and you walk into a contact, then perform your contact drill as rehearsed, and fire at the enemy’s muzzle flashes. Remember that if tracer is involved, either by the enemy or by yourself, then it lights up at 100 meters from the muzzle (if the NATO standard type). So it does not truly point both ways, which is why it is designed to light up at 100 meters. If the contact is taking place at ranges greater than 100 meters then you can also use tracer as a means of target indication. Tracer looks like blobs of light flying through the green night sky when viewed through night vision.
Consider the use of white light. If you are without night vision devices, then you definitely want to consider the use of parachute illumination rocket flares. Either the self-contained ones that come in a tube such as for maritime use, or the ones fired from a flare gun. If you put up a parachute flare you can get anywhere between 30 to 60 seconds of illumination. It will move with the wind, and cause moving shadows on the ground. Note: if you are patrolling and one of these suddenly ‘wooshes’ up, you should have time to hit the ground before it pops and illuminates the area. If you are caught by one actually bursting then it is often better to sink to the ground slowly with the moving shadows, rather than trying to bomb-burst into cover. This is a different immediate action from that with the trip flare, which produces immediate light, and leaves you no choice but to bomb-burst out of the illuminated area. Remember that if anyone puts up a rocket flare, it’s for a reason. Similarly, a trip flare or similar device will be positioned to cover an ingress route, and should be covered by enemy fire, as should all obstacles.
The sort of dim light produced by a rocket illumination flare is not really bright enough to completely destroy your night vision. Just don’t look directly at the flare. You can always close at least one eye, or maybe have some of your group close both, if you are acting covertly and the situation allows it.
If you have no night vision devices and need to illuminate an area, either for a hasty attack, raid, an ambush, or a defensive action, then consider the use of parachute illumination flares. This will allow those without night vision equipment to use iron sights or day optics to engage targets. It does not produce a full daylight effect. It produces a dusky world of moving shadows. A little bit of coordination will allow you to put up illumination as necessary, while coordinating the absence of it to cover movement. Note: I know of at least one incident where parachute illumination was used in an ambush, and due to the large smoke signal given off by firing a rocket illumination flare, the firer was killed by enemy return fire. Thus, if using rocket type illumination flares, fire from a flank and from cover.
Below: an example of the use of parachute illumination flares, in this case from light mortars, illuminating a night attack supported by a GPMG SF (Sustained Fire) support by fire line:
GPMG SF NIGHT VIDEO LINK
(You may wish to consider that video in the light of comments made about support by fire in this post: ‘The Maneuver Support Group (Designated Marksman Role)’).
You can also use powerful white light flashlights attached to your rifle. However, I would not recommend the use of such devices in the open. The use of white weapon lights is best confined to building and room clearance operations, where you are inside and using the white light to illuminate the room and clear it following entry. If you turn weapon lights on while out in the open, you are just inviting enemy fire. That is also an interesting practical point, the ‘negligent discharge’ of weapons mounted white lights. Be careful of accidentally hitting the on/off switch on a weapon mounted flashlight. Such an action can not only compromise your patrol, perhaps your move into your assault position for a raid, but it also washes out everyone’s night vision. Best to remove or reverse the batteries until such time as you are definitely going to use them, or use something like an inForce WML that has a safety guard over the button. Something to consider.
The use of rocket illumination parachute flares also bridges the gap nicely between complete unavailability of night vision devices and the partial availability of same. Perhaps you are occupying a defensive position and you only have a limited number of night vision or thermal devices available. Perhaps you have one device that is located in the OP (observation post), and is used to scan and observe your perimeter. If you get an incursion into your perimeter, and most of your team is just equipped with either iron sights or day optics, then once the enemy is detected you can put up parachute illumination in order to allow all of your team to effectively and accurately engage the enemy. This is a useful bridge use of night optics and white light. Consider also that a magazine of tracer rounds can be used by the night vision equipper person to point out an enemy location, which can then be suppressed by non-night vision equipped personnel. Find out if your tracer lights up immediately, or at 100 meters!
In a little bit I will move on to the actual use of night vision devices. What I want to say right now is use them appropriately. Even if you are fully equipped with high-tech night vision equipment, there is potential for the over-reliance on such equipment to have a negative effect. What do I mean by this? Well, perhaps you are conducting a raid, and perhaps part of the objective is a building. It’s a nighttime raid. In such circumstances it would be ideal for your support by fire team to be equipped with night vision equipment in order to allow them to generate accurate fire, and also most importantly to be able to track your progress on the objective and avoid a friendly fire incident. However, if you are the assaulting group it may not be best at all times to go with equipment such as PVS-14. Part of a raid is the use of speed, surprise and violence of action. It’s not some ‘black ops’ video-game. You may be better off putting up illumination rounds, whether that is rocket flares or mortar illumination, and going in hard. Maximum speed and aggression. That may also include the building, where you could clear it using weapon mounted flashlights once inside the building. It’s just something for you to consider, avoiding over-reliance on technology, which is one of the reasons why your PVS-14 will flip up on its helmet mount and allow you to get it out of the way when you don’t need it.
In fact, if we look at the Falkland’s War in 1982, it was indeed true that the Argentinean’s were equipped with night vision equipment where the British troops were not. The Brits went up the mountains using the basics of fire & movement, and white light when necessary or available. They mainly fought up through the darkness using basic fire and movement, with fire support as they could get it. Many of the Argentinean commandos were equipped with night vision sights on their rifles. These were responsible for many of the British casualties. This highlights several things. Firstly, technology does not always triumph over morale, training and aggression. Secondly, the combined use on the battlefield of both old school and modern technology, albeit on opposite sides.
If we move away from the defensive position to a more patrol situation, then let’s imagine that we perhaps just have one or two items of night vision technology within that patrol. Perhaps you have one PVS-14? Perhaps you have a single FLIR thermal imager? There are several options here. Perhaps your lead scout is using the PVS-14 on a helmet mount? This still gives the option of flipping it up or down as necessary. Perhaps even the lead scout, or the patrol leader, have the FLIR on a cord around the neck? Having the FLIR, or the PVS-14, either bungeed around the neck or flipped up on a helmet mount allows you to patrol without them, but then utilize them to scan ground ahead before moving over it.
A little bit on the technology. Your standard night vision devices, such as the PVS-14, are image intensifiers. This means that they amplify ambient light to produce the familiar green image (now, you can get white image versions). On a lighter night they work better, on a darker night not so good – because they magnify the available light. These are passive devices, in that they do not generate anything that can be picked up by an observer. They are equipped with an IR flashlight, which can be used to covertly illuminate a small area. However use of the IR flashlight device is an active measure which will be seen by anybody else using night vision equipment (just like an IR flashlight mounted on your rifle). Importantly, a night vision binocular or monocular is not a magical device. If you could hide from an observer with the naked eye, you can hide from an observer wearing a PVS-14. It is more a case that an observer with a PVS-14 has an advantage over one without, yet both see worse than they would during the day, it is simply a matter of degree. Also, it is important to note that if you use an old-school binocular night vision goggle you will lose depth perception. This is why the monocular, such as the PVS-14, is preferable over the PVS-7. It allows you to retain night vision in the unused eye, and allows you depth perception.
A thermal imager, or FLIR, uses a different part of the IR spectrum than an image intensifier, and detects heat emissions. Therefore the picture you see is made up of the heat differentials observed. In that sense a thermal imager is a little bit more magic than an image intensifier and shows you a video image. These devices are great for static observation. With a small handheld FLIR device, about the same size as a PVS-14, you are looking at a tiny little video screen. In my opinion, such a device is best used for periodic scanning in a static OP, or if out on patrol scanning from a static position over the ground ahead.
With both of these devices, the use of terrain, vegetation, and adverse weather conditions, to mask your movement, will be effective. Thermal imaging is a little bit harder to defeat.
If you are mobile, rather than in a static OP position, there is a best way to mount and use these devices. In a static OP there is no reason why you cannot use an image intensifier or thermal imager just like a set of binoculars, by having them around your neck and using them for routine scanning. You can also do this while on patrol. You can also have a thermal sight mounted on a rifle for static security work. If you have an image intensifier such as a PVS-14, then the best thing to do with it is mount it over your eye on something like a helmet or a purpose designed soft cap device like the ‘Crye Nightcap’ which is great for folding down and stowing unlike a helmet. The head mount will allow the PVS-14 to be flipped up and out of the way as necessary. You don’t want your night vision device mounted as a sight on your rifle when on patrol, simply because you can only use it when aiming your rifle from the shoulder. If you want to patrol with the benefit of the PVS-14, then have this monocular device mounted over your eye so you can actually use it as you walk along.
Above: Crye Nightcap with PVS-14 Mounted
If you are also carrying a handheld FLIR thermal imager then I recommend you keep this to hand in a pouch or hung around your neck. You can then stop, flip up the PVS-14, and scan with the same eye using the FLIR. If it matters to you, this will also preserve night vision in the unused eye.
There are a number of Night Vision Device options out there and new technology comes along all the time. The latest generation of devices includes ones with four ‘tubes’ giving you two tubes per eye. There are also combined thermal/IR devices available which are amazing, but they come with an extreme price penalty. Combining thermal into an IR device seriously upgrades the capability of picking up and observing enemy out there. For a more reasonable price point you can pick up a PVS-14 from a reputable vendor such as JRH Enterprises. It will cost you $3000 or more. That is a sickener, but given that it is literally a ‘night and day’ difference I cannot put a price on it. If you can afford it, or if you have to sell some safe queens from your collection, do it. At base, you should have a helmet mounted PVS-14 for patrolling and engaging, and a thermal device for scanning. I would not even consider 1st or 2nd generation older items, particularly Russian equipment. I know there is an argument that something is better than nothing and no doubt this statement will generate some comments, but the 3rd Generation Autogated PVS-14 is such leaps and bounds ahead, of even the PVS-7, that I would urge you to purchase.
Of course, having a monocular night vision device mounted over your eye, most likely your dominant eye, will give you difficulties if trying to engage enemy with your rifle. The solution to this is a weapon mounted IR laser, zeroed to your weapon. This bridges the gap between what you can see through your monocular and the fact that you cannot use your sights. These IR lasers will give you effective engagement distances out to maybe 100 or 200 meters, which is all you need. To engage, you simply turn on the laser with the switch mounted on your hand guard, point, picking up the laser dot through your PVS-14, and shoot.
So to be clear, do not mount your PVS-14 to your rifle, or try to sight through your rifle using NV capable day sights along with your head mounted PVS-14. Use the IR laser by looking over your sights and pick it up through your head mounted PVS-14. Use the momentary switch so that your laser is not on all the time, giving you away to other night vision equipped people. The one time that I would consider using a weapon mounted night sight would be a thermal sight mounted on a designated marksman rifle. This would be used from a defensive OP, or from a support by fire position for offensive action. Note that a thermal-only device will not pick up an IR laser, including those of friendly troops. Also note that thermal will not see through glass, which informs where you will position your observer.
As to my comments about using head mounted night vision for CQB, I would urge you not to do it, but use judicious use of white light inside buildings. The PVS-14 only gives you a 30 degree field of vision, and it has to be focused to a certain distance (we usually focus it out for patrolling). This means that at close range you have limited blurry vision (albeit you can see what you can see out of your other eye and peripheral non-aided vision). Thus, imagine entering a dark room: someone can get on you at close range fast. Also recall that absent ambient light, such as in a dark room, you need to use artificial IR light to see with a night vision device. Hence, clever use of white light for CQB.
The question often comes up of how to mount your night vision monocular to your head. The provided ‘skull crusher’ is not popular. The most effective way to mount this device is on a helmet. But no one wants to wear or carry a helmet. There are a couple of options: you can wear a ‘bump style’ ProTech or airsoft knockoff tactical helmet which will comfortably mount the night vision equipment while being lightweight. If you want ballistic protection you can buy a MICH or ACH helmet off the Internet. You can also purchase lighter ballistic helmets such as the ops-core FAST helmet. Only you can decide what you’re prepared to wear. Yes, I know that a ballistic helmet does not stop direct strike from high velocity rounds. But depending on the situation, if you’re going to carry a helmet for your night vision equipment, it may be worth carrying one that is also ballistic protected. You never know what it may stop. If you are doing covert stuff, then carry a Crye Nightcap. Each to his own.
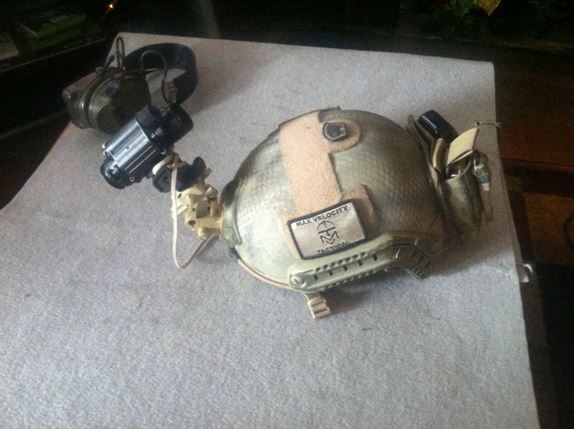
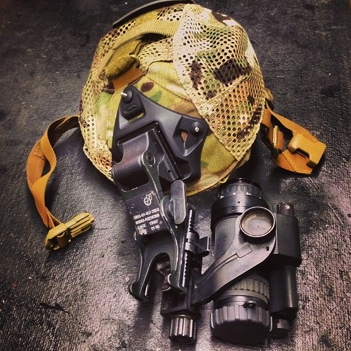
Above: ‘Gunfighter’ Helmet with Night Vision Attached
I will say this, in my opinion, it would be better to have one battle rifle equipped with an IR laser, have a PVS-14 mounted on a ballistic helmet, and a handheld FLIR thermal imager, than a safe full of rifles and no night vision capability. You don’t have to use this stuff all of the time, but if you have it you have the choice of using it. For example, if you are hidden out someplace with your family after the SHTF, it’s going to be dark out there keeping watch at night. With a PVS-14 and a FLIR you have the excellent capability of being able to scan your perimeter and pick up threats. You can even use these devices on ground domination activity patrols (GDA). Yes, I’ve told you that you can work out there at night, but the flipside is that without the equipment your visibility is seriously impeded, and without electric light it is very dark out there.
So now we get to the other end of the scale. You, and the rest of your tactical team, have invested in this equipment. This means that you are not at a disadvantage against any aggressors who are similarly equipped. You don’t have to patrol all night with your PVS-14 over your eye, you may not feel it is appropriate or that the threat is high enough at all times. But you have the ability to flip it down and see what’s out there. You also have the ability to pull out your FLIR thermal imager and scan the next bound of your patrol movement. That’s a pretty convincing sales pitch for night vision equipment, right? I know that I want to be able to scan ahead of me and pick out that ambush force before I walk into it, if I have the chance to do so.
One of the big problems with night vision equipment and thermal, is the expense. I refer back to what I said above about the number of rifles you have. Sell some: how many rifles can one man carry anyway? Night vision and thermal equipment is such a game changer that I believe it is worth the sacrifice to invest in it. At the very least, you want one PVS-14 (or equivalent) and thermal imager for your family group. I refer you back to my comments on the use of white light and parachute illumination flares for situations when you need to engage but not everybody is equipped with night vision optics.
A little earlier when discussing raids, I touched on the dangers of fratricide. This is something that needs to be taken very seriously. Given that an assaulting force should properly be sweeping across the objective from the flank of the support by fire group, it is necessary for the fire support group to know when to shift fire away from the assault element. It doesn’t want to happen too soon, but it doesn’t want to happen too late. There are various methods that can be used: you can use radios to report objectives reached or phase lines, or something along those lines. You can use other signals such as light or flares. However none of these are foolproof. You want to use pen flares to signal a shift fire? Well, when the tracer is winging both ways up and down the objective and ricocheting off in all different directions, then you may find it hard to spot that flare, even if it is a different color from the dominant tracer. Things have been tried such as attaching light sticks to the end guys in the assault group. Again it doesn’t work very well and it also opens them up to being seen by the enemy.
I’m not trying to paint a picture of doom and gloom, but clearly fratricide avoidance at night poses a challenge. If the fire support group is able to view the assault going in through night vision equipment, then we are in a better place. Oh, by the way, you may want to get that IR glint tape off your equipment; It reflects back when lit up by active IR from helicopters, in order to determine friendly forces. There was also at least one friendly fire incident where US Helicopters opened up on guys equipped with IR strobes, thinking it was muzzle flashes. The strobes were being worn to designate friendly troops!
In summary, if I found myself without any night vision equipment, I would not consider that sufficient reason to give up. I have spent enough time wandering around the darkness to know that it can be done. However, night vision and thermal equipment is a definite game changer. If there is any danger that your adversaries will have it, and there is because it is widely available in the US, then you should also try and get hold of it too. You cannot simply buy night vision, put it on the shelf, and expect to ‘own the night’ when the grid goes down. You need to train with it, shoot with it on the ranges, and spend time with it in the woods. This is why we run a Night Firing class where we zero the lasers, conduct shooting drills and then a controlled night raid on a simulated objective. I have seen panic on night patrol classes where those with Night Vision, never practiced, are impacted by that sudden realization that it is not the perfect solution. It is affected by dark nights under the canopy, by fogging and rain. This is why you need to train with it – if you take it off the shelf and expect to be a night ninja, this often leads to claustrophobia and rising panic. Don’t be that guy. However, once proficient, you will be glad you made the decision to get that PVS-14. I consider it a tactical necessity.
For questions and discussion: MVT Forum.

A shout out to Robert of JRH Enterprises, a multiple MVT Alumni and my source for all things laser, optic, and night vision related.