Combat Zero your AR

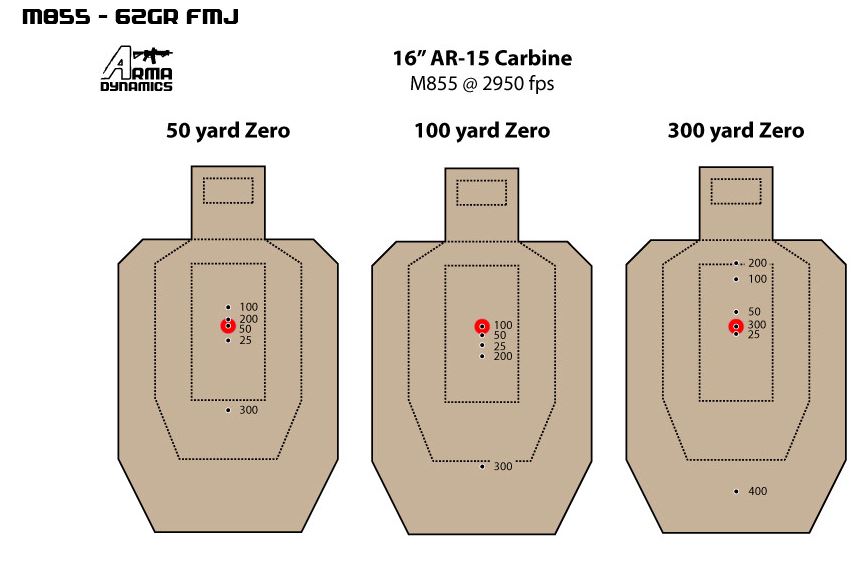
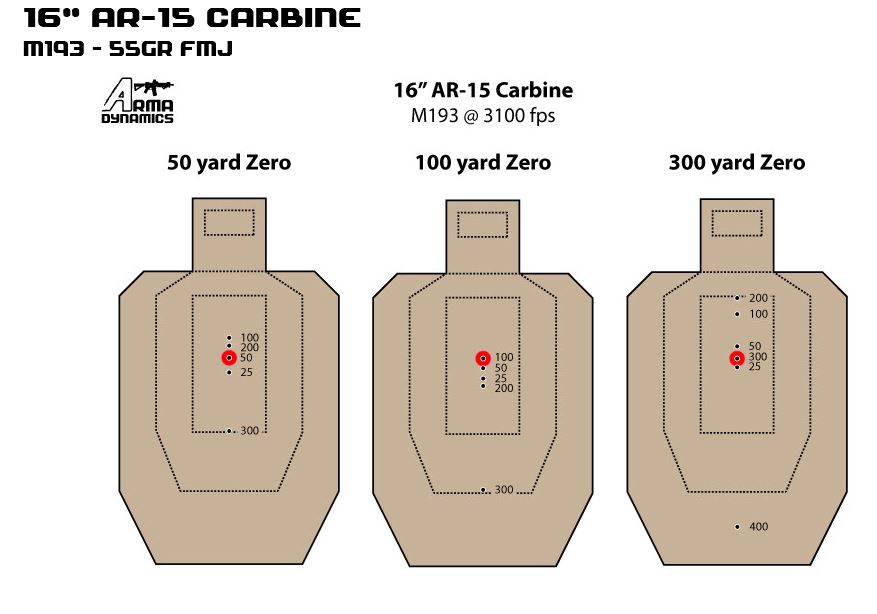
Following First Sergeant posting this great webpage (Arma Dynamics) with zero / fall of shot graphics on the Forum, it seems like a good time to follow up with some info that we usually go over at the HEAT 0.5 / HEAT 1 Classes when conducting zeroing.
I notice a couple of things:
- There is confusion over Meters and Yards.
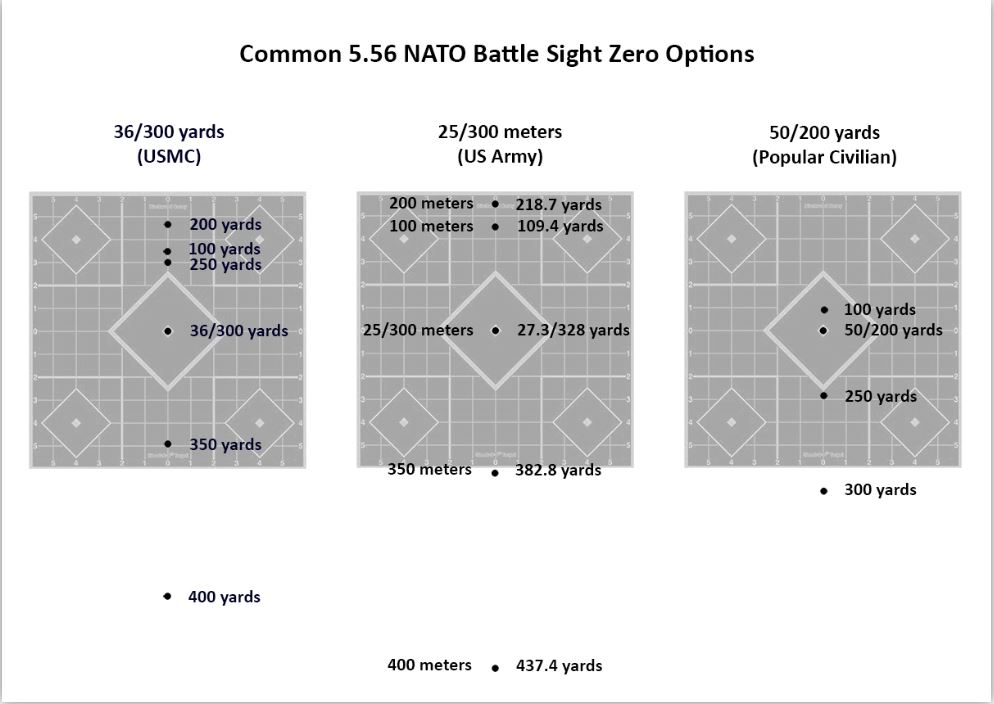
- There is a push, after a retired Navy SEAL dude did a video on it, to think the 36 Yard zero is the be all and end all. The 36 Yard zero was not included in the graphics on the awesome web page (which also allows you to print targets for your specific zero).
- There is confusion over why we are zeroing in a certain manner, and to a certain extent this comes from people’s reasons for zeroing i.e. end-user purpose.
So for our purposes, we are zeroing for combat application. The graphics shown are specifically for using a red dot optic, but that makes no difference to the ballistics of the zero, whether you are using a red dot or a magnified optic of some sort. However, using a red dot optic may have an implication (I will cover this) in terms of the distance you expect to engage at, thus which of the zero options is best.
What we are trying to do with this magic is to get the furthest Maximum Point Blank Range (MPBR) zero that we can. Point blank isn’t what you think it is (as in arms length). It is the distance that you can simply place your sight center-mass on your target, and expect to hit within that center mass, without any holdovers or holdunders. Thus, we are being lazy, but lazy is good for shooting under combat stress conditions. The size of your target zone is really arbitrary, but we can say that it is the size of the chest or even upper torso of an enemy. You can compare target zone sizes by using the zones on the pictured IPSC targets.

Of the 50, 100 and 300 yard zeros, the 50 yard (meter) zero is usually considered the best. When you look at the fall of shot per range, you can see it is well clustered, due to how it utilizes the specific parabola of the ballistic fall / drop of the round. On both the 193 and M855 above, the rounds only go a couple of inches high at 100, and as the round goes out to 300 it is either still within, or just below, the A zone, which is good enough for me. Thus, there is not much thinking to do out to 300, you can point and shoot, and of course beyond 300 you simply have to holdover as range increases.
The 100 Meter zero has long been my favorite. The round never goes higher than it is at 100, where grazes through and then drops off. This is going to give you (if we use the A zone) less of a MPBR, maybe out to 250, and then your rounds are dropping. What is good about this is that your rounds are never high. Thus, if we only had a head to shoot at, our rounds are not going to pass over that head. If the rounds miss, they will miss low, and it is better to miss low than high, because you have more chance of seeing splash below the target. In that situation, you simply have to compensate by aiming up.
There is an another aspect to this to do with the red dot. You have to question the utility of the red dot beyond, perhaps, 300 meters. If you only expect to be using red dot inside those distances, then the 50 meter zero is perfect. Once you go beyond 300, you will need to add in a holdover. Once you go beyond 100, you need to compensate for wind. Thus, we get into the realm of ‘Application of Fire.’ A magnified ACOG (usually x 4) is designed to take a 100 meter zero. Thus, the round will never get higher than where it passes through at 100 meters, and thereafter will be dropping. This is why included in the reticle of the ACOG, there are range lines up to 800 meters. The width of those lines even equals the average width of a mans shoulders at the required ranges. Thus, you estimate range and aim up to compensate for distance.
A basic fieldcraft skill of an infantryman is estimating distance. Once you get beyond MPBR you have to estimate distance. Or, hit low and adjust if you get it wrong. Estimating distance and aiming off for wind are the two components of Application of Fire. Thus if you are shooting beyond 300 you will definitely need to apply this to your shooting. My opinion at this time, and it’s just my opinion, is that if I am using a red dot, I will do a 50 meter zero. If I am using an ACOG-style magnified optic, I will zero it for 100 meters.
The issue to me with the 300 Meter zero, if you look at the graphics, is that out at 200 the POI is significantly above the POA. This is going to be an issue for me. If you don’t know this, then you are going to sometimes be missing over the top of the head that is taking cover and putting rounds back at you at around 200 meters. That is seriously not cool. In fact, I have to admit to being caught out by this when running a known distance shoot on a US Range using an M16. My experience was British Army 100 meter zeros, and thus add a holdover as range increases, or when you miss. Not knowing that the POI was high at 200, I’m raising my point of aim and putting more rounds over the top of the target. Not cool. Until the zero was explained to me.

Now, supposedly the 36/300 Yard USMC zero is the solution to all this. So, the Army 25/300 Meter zero is a bit of a fudge. In fact, when you zero at 25 meters, you add a click of elevation to make it work better. As shown in the middle graph above, it gives you that high POI at 200 meters. In my understanding, the 36/300 Yard USMC zero is simply a better way of dialing the zero in for 300 Yards, by shooting it at 36 yards. Tell me if I am wrong. Thus, what this gives you is less of a spread of rounds, but still largely the same issue as the Army 25/300 Meter zero. It’s probably better than the Army version, but still not what I would consider a solution.
Now, remember that with all these zero solutions, you can shoot them all at 25 meters, using a solution for difference in POA to POI. There are targets for this on the Arma Dynamics page, which you can download. In simple terms, if you are shooting a 50 meter zero, you will want your group (mean POI) to be 1″ below your POA at 25 meters. Because your rounds are, at 25 where the target is, still rising to reach the desired 50 meter zero point. For a 100 meter zero, your rounds at the 25 meter target will be 1.5″ below the POA, for the same reason as the 50 meter zero – they still have to rise to 100 meters.
In conclusion, I would say that given the reasons laid out, for a red dot combat optic, a 50 meter zero is ideal. For a magnified optic, in particular one such as the x 4 ACOG, a 100 meter zero is ideal. However, the information here is for your use, and you should do whatever zero you find best.
